I’ve been making salads in a jar for over a year now and I can’t say enough about them. Talk about convenient and easy to put together. I don’t make just one when I pull out the fixins—I make at least five to get me through the coming week. And it always amazes me that the fifth one is still good and fresh when I pull it out.
If I haven’t had time to make lunch for work, I can just reach in the fridge and grab a jar—instant lunch! Love it! The trick is to make them in the correct order so that they don’t turn soggy. And they won’t as long as no one pulls one out of the fridge and turns it upside down and puts it back in the fridge….someone could and has done that in my house! Grrrrrr
Advance Batch Prep
Do you feel you don’t have time to make healthy lunches for yourself? I hear ya. Life can get beyond hectic at times. You may be a stay-at-home Mom with a bunch of kids running around and a big to-do list to get through for the day.
Or you may be a Mom that works outside the home and has a hectic job. Or you just might like salads but think it’s a pain in the neck to cut up all those veggies for a good salad, so you pass.
Whatever your lifestyle, mason jar salads, are the bomb and very easy to put together. As I said earlier, as long as you put them together correctly they will store in the fridge for quite a long time.
You’ve got a ready-made, healthy and yummy lunch or dinner, that will give you a boost of energy to get you through the rest of the day. I’m going to tell you step by step how to prepare them. And you don’t need much in the way of supplies.

Tools Needed to Make Mason Jar Salads
Mason jars with lids are about the only thing you need to make these salads. But I guess you could say a paring knife, cutting board and also all the salad fixins you desire.
The thing I have to say about the jars is this; if you already have jars, then use what you have. But if you are starting out with having to buy the jars, get the wide mouth mason jars and lids. This makes it easier to get things in and out of these jars.
And you can choose whichever size jar you want. I started out with the quart size jar. I found that I couldn’t finish the whole salad at one sitting, so I went with the pint jars and these are perfect for me.
You don’t need to get these jars at a store somewhere. If you are really budget conscious, then keep your eye open when you stop at garage sales, flea markets or antique type shops. I see them all the time, at very reasonable prices.
What Size Mason Jar is Best to Use
Mason jars come in several different sizes and they all will get the job done. The size to choose depends on who the salad is for. So, let’s take a look at a few different size jars.
Jelly Jar (8 oz.): For an adult this would be too small; however, may be just the right size for a little munchkin that wants a salad when you do. It’s not too much and will make them happy to be having the same thing the grown-ups are having.

Jelly Jar (12 oz): This size may fit for an older kid, so you have to give it a try and see if this is enough. It may be just the right size. I no longer have smaller kids in my household to try this out on. So, if you do, give me the scoop after you try this size.
Pint Jar (16 oz): This is an excellent size for a side salad, light lunch or snack size salad. And is also a good size for someone that has had bariatric surgery, like I have. This size is perfect for me.
Larger Jars
Pint and a half (24 oz): I can’t say I’ve ever used this size jar, but wanted you to know it is out there. I’ve read several times where someone else used this size for their mason jar salads and that it is the perfect size. Give it a try, if you come across this size jar and let me know what you think.
Quart (32 oz): If you are a big time lover of salads or are making some for the men in your house, this is probably a good size for them. It’s a good option for a dinner-salad or maybe even a lunch sized salad for two.
This is the size jar I use if I want to take lunch to work and get two salads out of it. It’s the size I first used when I started making my salads in mason jars but found it to be too big once I had bariatric surgery. So, you’ll have to give this a try—it may be just the right size for you.
Note: After a while of making up these jar salads, I noticed that the usual metal lids were beginning to look unappealing. After looking online, I saw I was able to replace the metal lids with plastic which I ended up getting from Amazon. And truthfully, I like the plastic lids much better.

Steps to Making Mason Jar Salads
- Advance prep any needed ingredients. By this I mean to get your chicken cooked and pulled apart ahead of time. You would do the same with bacon, ham or eggs that you might put on your salads. Cook your grains like quinoa.
Actually, I do this a day or two before I assemble my salads. But no more than two days. I will also make a larger batch of something like the chicken, pull it apart and what I don’t use for the salads, I put in single servings in the freezer for anyone to pull out and use.
- Collect the number of jars and lids you are going to use.
- Collect all the fixins you will use—lettuce, onion, tomatoes, egg, protein, bacon bits, carrots, cranberries, nuts, seeds, granola, avocado, fruits, dressings, etc. Whatever you will use to put in your favorite couple of salads.
- Wash, prep and cut up any ingredients you will be using. Doing all the prep work including chopping ahead of time saves time during assembling.
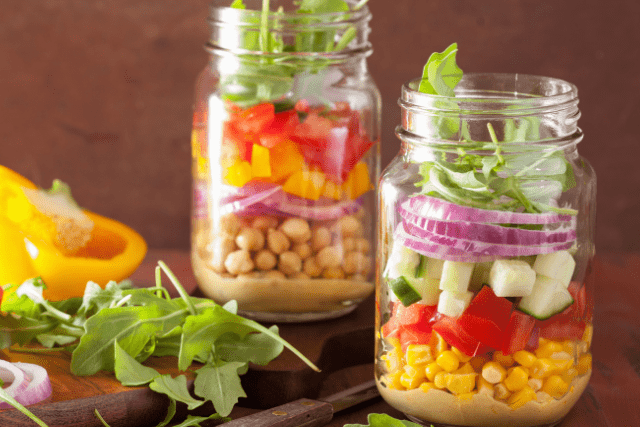
- Layer your salads properly. This step is the most important because how you layer the salad makes a difference in how soggy or crispy your mason jar salad ends up. So layer your salad as follows, starting at the bottom of the jar and working your way up.

Layers to Follow When Making a Mason Jar Salad
-
- Layer 1: Salad dressing gets put in the jar first so that it is at the bottom.
-
- Layer 2: Hearty veggies you will be using such as broccoli, carrots, radishes or grains (like buckwheat).
-
- Layer 3: Next go for beans and the softer veggies and fruit—corn, cucumbers, blueberries, strawberries, cranberries and tomatoes.
-
- Layer 4: Pasta and Grains
-
- Layer 5: Protein—chicken, hard boiled eggs, quinoa, fish, etc.
-
- Layer 6: Greens–Don’t fill the greens quite to the top so you have a little room for the last layer.
-
- Layer 7: Add your shredded cheese or granola, nuts and seeds on top of the greens.
-
- Final Step: Seal your jar tightly and store in your fridge.
- Note 1: notice that nothing is on top of the greens that will make them soggy. Anything that can make your greens soggy goes below this layer.

The best part—(besides eating them, of course) is that you can make up about 10 mason jar salads in about an hour that will stay perfectly preserved throughout the coming week or so.
Don’t Make Each Jar Separately
I manage to make these salads quicker by ‘not’ assembling each jar separately and then starting on another. Instead, I put my dressing of choice in every jar separately, then add the heartier veggies in each jar and then move onto the next layer and so on.
Doing each jar separately means I’m going back to each ingredient more than one time which takes more time. I put each layer in each jar before I move onto the next layer for any of the jars.
After assembly is complete, put the lids on and store in your refrigerator for up to a week and a half. I’m sure there have been times I’ve had these salads in my refrigerator for maybe even a little bit longer, but they were starting to wilt a little after that.
The nice thing though is for the next week and a half, my family and I are able to just reach in the fridge and pull out a fresh and ready-made, healthy meal very quickly, whenever one was wanted.
All that was needed is the jar shaken up and eaten right out of the jar or you can choose to dump the salad out in a bowl, whichever you prefer.
I usually end up using a bowl or plate as I tend to pack so much into the jar, I can’t really shake it up. I can turn it upside down to start letting the dressing run all over the salad. Then you can open the jar and start eating.

Once you have eaten some of the salad, then it’s easier to start moving the ingredients around to make sure the dressing is everywhere. But this is up to you. However, you choose to have your salad—go for it.
If you would like a few salad recipes, like the one above, to get you started, just fill out the form and the recipes will be in your inbox in no time!
Final Thoughts
Once you get the order of assembly down, you can start to make all kinds of different salad recipes to put in your jars. Making salads this way is very forgiving, so it really doesn’t matter what you use for ingredients. It only matters where you put them in the jar.
I’ve included a recipe sheet of a few different salads for you to download. They are all delicious and after making these salads on your own, you will be convinced at how easy they are. Bon Appetite.
Take Care,
Cher
Relevant Reading
Simplifying Your Home and Life
Vitamins and Minerals for Women
Keto vs. Low Carb