Are you a budding herbalist and don’t know what herbs to grow and use?
There are an unknown number of plants on our good earth and I believe they are here for a reason, like helping us medicinally, for use in cooking, etc.
Many of these plants can easily be made into teas, salves, balms, tinctures, lotions and so much more to help us medicinally. But what if you are new to the art of herbs.
Where do you start, especially if you want to grow your own to start using them for your family rather than run out to the nearest pharmacy when something is needed to address a common ailment.
I’ve put together a list of herbs that are easy to grow, and will also give you a well-rounded supply of both medicinal and culinary herbs to experiment with throughout the year.
You can harvest herbs anytime throughout the growing season. In fact, you want to harvest the herbal leaves and flowerheads often. Frequently pruning your herb plants will encourage more growth.
No Green Thumb Needed
I’ve always admitted that I don’t have a green thumb and that hasn’t changed, so when I start thinking of spring and what I’m going to put in my garden this year, I’m going the easy route. I’ve no choice, since I already know I don’t have the innate knowledge of how to grow plants that those with green thumbs seem to have. I’m truly envious.
So, when I thought about doing a post about what herbal plants to put in your garden or grow inside, I decided to go the easy route here too.
Easy to Grow Plants
The plants that I chose grow fairly easily, have medicinal powers, look great in an arrangement and tastes wonderful when used in cooking! It all sounds good to me!
I know there are many like me that don’t really want a full-scale garden or don’t have the space.
I’ve chosen some plants to grow outside in a small patch and the remaining can be grown in your home to give you some live plants to sit around or use when cooking.
The plants that will grow outside can also be cut to put in vases to make your home look lovely and smell good too. Then at the end of the growing season you can harvest what you need to make your medicinal remedies to be ready for the coming winter season. I’m all for anything that can be used more than one way.
Spotlightmyhealth.com is a participant in the Amazon Services, LLC Associates Program, an affiliate advertising program designed to provide a means for this site to earn advertising fees by advertising and linking to Amazon.com and affiliated sites.

Herbs to Grow Outside
Ashwagandha (Indian Ginseng)
This herb has been used in Ayurveda traditional medicine for centuries. Ashwagandha supplements can be expensive to purchase so why not grow your own. It’s fairly simple to grow in your backyard and is a plant that can thrive with little care.
This plant loves dry soil and is extremely drought tolerant.
You want to start the seeds in soil that is at least 70 degrees F and it will take the seeds about two weeks to germinate. Ashwagandha will grow to about two feet high.
Harvesting
It’s the root of this plant that is used for medicinal purposes. You want to harvest the roots before the first frost right after the fruit has completely matured. Then you want to store those roots in a dry area so that the roots dry out completely.
You may notice that Ashwagandha roots smell very medicinal which should not be surprising since many medicinal herbs smell this way. The roots also taste bitter and should be made into a powder with a pestle and mortar. It is the root powder that you would use medicinally.
How to Use Your Herbal Plant
Ashwagandha powder can be mixed with milk and honey to mask the taste. You can also put the powder in supplement capsules like these that you can get from Amazon very cheaply.
Benefits
**Improves cognitive function and focus
**Helps to lower stress and anxiety
**Assists with memory loss
**Has anti-inflammatory properties that make it great to use for arthritis
**Helps to reduce cortisol levels

Calendula (pot marigold)
Calendula is known as a perennial in warmer climates, but in the US it’s grown as an annual. It grows best in full sun but will also tolerate partial shade.
Since this plant doesn’t do well in poor soil, choose a spot where the soil is at least moderately fertile and well-draining because Calendula needs to have regular watering. Don’t let the plant dry out.
Remember to cut these flowers back which will encourage more blooms. This is a good opportunity to make yourself some arrangements in vases to sit around your home.
If the foliage on any of the potted plants starts looking haggard and droopy, cut the plant back to about three inches. This will encourage new growth.
Calendula flowers also do something else that is very good for your garden. They attract bees, butterflies, and other pollinators which are very beneficial to your garden.
Harvesting Your Herbal Plant
You should harvest the blooms when the flower petals begin to open. Any blooms left on the plant develop into seeds. And the seeds are ready to harvest when they turn brown.
How To Use
Calendula petals are edible right from your garden. The entire calendula flower is used in healing skin ointments, salves, oils, and teas.
Benefits
**Treats swollen lymph nodes
**Builds the immune system
**Used to treat rashes, minor wounds, abrasion, stings, swelling and scrapes and bruises
**Treats peptic ulcers

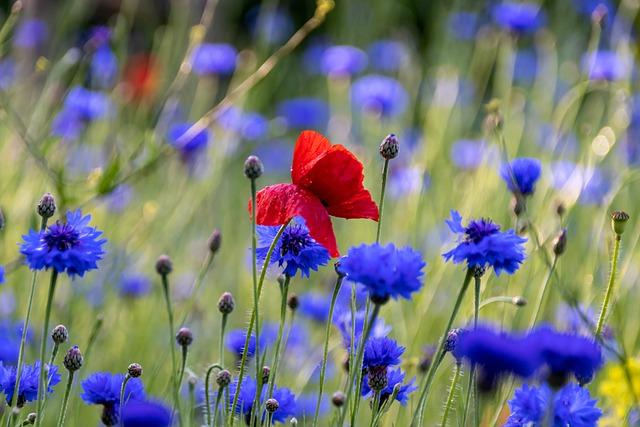
Cornflower (bachelor’s button)
Bachelor’s Button is a very common annual flower that self-seeds and returns the following year. You won’t have to buy seeds again as you’ll have plenty after your first season of growing this plant. They make great cut flowers and dry nicely too.
The Cornflower can tolerate freezing temps, so the seeds can be planted in early spring. Grow these flowers in full sunlight but they can also tolerate partial sun.
The easiest way to get things started is to put the seeds directly into the ground in early spring after the last frost. If you do this and your seeds sprout between March and May, you could see blooms between June through September.
Harvest
Harvesting should start when you see the seed pods open after they’ve hit maturity. Gather enough of the seeds for next year and store them in a clean dry place. Once you have enough seeds, cut all remaining blooms to be dried to use for the coming year’s medicinal needs.
How to Use
It is the dried flowers of Bachelor’s Button that are used to make the medicinal remedies that you and your family may need. All you do is steep the dried blooms to make tea.
Cornflowers can also be made into an herbal oil to use in the making of skin-healing balms or creams. Add it to lip balms or skin care preparations.
Benefits
**Potent anti-inflammatory
**Soothes and stimulates healing
**Has diuretic properties
**This flower contains plenty of potassium and also has mineral salts, calcium and
flavanoids
**May help with fever and also constipation
**Good for your skin
**Can help ease menstrual cramps
**Helps with stress, anxiety and depression

Chamomile
This plant can grow to two feet tall, has white flowers and I’m told smells like sweet apples. I can almost smell them, emmmmm.
Chamomile has been used medicinally since ancient times and even though there are many species, there are two main species—German Chamomile and Roman Chamomile. I’m mainly going to write about Roman Chamomile.
Roman Chamomile is an annual, low growing, flowering plant that is fairly easy to grow. (If your chamomile gets tall, then you may have the German Chamomile—this can also be used for medicinal purposes)
How to Grow
This plant prefers full sun but will also tolerate partial sun if it’s planted in well-drained soil and gets watered regularly. It also grows nicely in containers.
Chamomile plants have a strong scent which many insects don’t like. This is beneficial to the chamomile plants and also the plants growing around it
Don’t put your seeds directly into the ground, but instead start them 6-8 weeks indoors before the expected final frost.
Chamomile seeds like light and warmth to germinate and you can basically drop them onto the plant soil that you are using. They need very little soil cover. When they get to be 5-6 inches, you can transplant them outside after the last frost.
Harvesting
Begin to harvest your chamomile when the flower petals begin to curl downward.
In order to dry the flower heads, you want to separate them and arrange them with some breathing room in between on a piece of cheesecloth or a mesh surface.
Store your flower heads in a cool, dry place for about a week to give them time to dry out.
How To Use
You can make your chamomile tea from the dried flower heads, but you can also use fresh flowers for the tea. If using fresh flowers, you will need more of them to get the flavor you want. Drying the flower heads makes them more potent.
You can put the dried flower petals in a tea infuser or make your own teabags.
Benefits
**Stimulates immune system
**Used for stress relief
**Sleep aid
**Helps soothe skin rashes and irritations
**Calms the nervous and digestive systems
**Decreases inflammation
**Helps calm irritable bowel flare-up and tummy aches in kids

Lavender
I love this plant; my eyes and soul smile when I look at a bunch of lavender. It’s a well-loved perennial shrub that is grown in many gardens, outdoors and indoors.
Lavender prefers full sun, so make sure that the plant gets at least 8 hours of direct sunlight per day inside and outside.
This plant is drought tolerant and does not like being overwatered; it prefers well-draining soil. You should prune your lavender plants, in the spring, just after their first bloom. Only prune back a third to a half of the growth.
Lavender will attract pollinators to enjoy in your garden and then go off to spread the good cheer.
Growing Indoors
When growing lavender inside, it’s important to get the right size pot. This is because it can’t grow the same root system that it does outside to get through a drought. Your container and soil also need to provide good drainage.
Use a good potting mix and fill your chosen container to an inch or so from the top. Place 4-5 seeds in your pot and lightly cover with soil, then lightly mist with water. Once your plants are 5-6 inches tall, they can be transplanted to a bigger container with a hole in the bottom for good drainage.
To ensure drainage and before filling your container with potting soil, cover the bottom of your container with rocks and then place a plate under your container to catch the water. This is a good thing to do for most of your container plants, indoors and outside.
When you stick your finger into the soil a few inches and the soil feels dry, it’s time to water your lavender plant. This is a good indicator for when to water all your plants.
Harvesting
You want to harvest your lavender at different stages of growth. It’s best to know ahead of time what you are planning on using the lavender for. If you plan to use lavender for fresh arrangements, cut the plant when the blooms are half to three-quarters open.
If you are going to use the plant for dried arrangements, then harvest the lavender early enough. Harvest when there are very few blooms or no blooms open.
Only cut the stems when you are sure the dew has dried on your plants. Cut your stems to between six to eight inches long. Place groups of the stems together, no larger than three fourths of an inch wide.
Arrange the bunch of stems so that the flower heads are even. Then use some type of twine or pretty ribbon to bind the bunches together near the flower heads. Wind the twine tightly down the stems. You can also cut the stem ends so that they are neatly even.
The lavender bundles should be hung upside down, in a cool, dry place where there is no direct sunlight. Make sure there is good air circulation. When the lavender is dry, use as you want!
How to Use
Lavender has so many uses that it would be impossible to name them all. It can be made into sachets for your drawers and closet. You can make all kinds of infusions with oils or vinegars, or you can make a salve. Check out the bug bite stick recipe from The Nerdy Farm Wife.
I think it’s a great idea that I’m going to try. You can make lip balms or bath salts. Just remember that most essential oils need to be diluted with a carrier oil. See my post about carrier oils.
These are just some of the ideas you can use lavender for or many of the medicinal herbs that have been around forever.
For more information on Lavender, check out the Missouri Botanical Gardens.

Indoor Growing
This next section of medicinal plants I’m going to discuss planting indoors. They all can certainly be grown outside in a garden or in containers on your deck or patio. I’m choosing indoor planting to make it easier to also use when cooking.
I would also suggest getting seedlings or starter plants from your nearby farmers’ market, nursery or garden store rather than starting from seeds.
Note: When you purchase these plants from an inside source and plan on growing them outside then you will need to “harden” your plants.
This simply means that you need to gradually expose them to the outdoors before they can stay outside.
Hardening your plant is an easy process. Start out by setting your plant out in indirect sunlight for an hour or two per day.
Do this for a few days. Then gradually add a bit more time and direct sunlight each day until your plant is outside all day.

Basil or Holy Basil
Basil is a very versatile herb that you can grow indoors and outdoors. Even though this plant isn’t hard to grow it is very picky about the conditions (sun water and temperature) for its growth.
Indoors
To grow basil indoors, all you need is a container and a sunny window. It grows very well in pots which makes it perfect to sit on your patio/deck or porch or inside your home. Basil is like chamomile–it’s a plant that keeps the bugs away.
The most common variety for cooking is sweet basil (also known as Genovese), which does well in pots/containers. It’s a safe bet if you want that classic basil flavor to cook with.
Basil likes heat, staying watered and room to grow. Use at least a 10-12” deep pot or container with good quality potting soil for each plant that you transplant once getting home. Water basil regularly or when the surface of the soil feels dry.
Outside
Basil is very sensitive to cold temperatures, so keep it indoors or wait and buy seedlings a couple of weeks after the last expected frost.
Not only does basil not like cold temps, but you can also add dry soil, being ignored or being crowded to its list of dislikes. So, you will have to spend some time taking care of this plant pinching and pruning, making sure it’s not crowded by other plants and that basil has enough water.
To pinch/prune, pick branches from the top and be sure to clip or pinch from just above the next set of leaves. Doing this can be done on any of your plants as it encourages bushy growth.
Harvesting
Start harvesting leaves as soon as the plant looks like it can spare them at around 6” tall or so.
At the end of the season, cut your plant down close to the ground and pick off all the leaves from the cut branches. Throw away any leaves with spots or discoloration. These leaves can then be dried and stored for year-round use.
How To Use
It’s the oil in basil leaves that makes it such a helpful herb but unfortunately, they are quite delicate and become weakened with drying. Because of this, I suggest using fresh basil whenever possible.
After that, the easiest way to use basil is to make tea. Tea will help for most ailments you want to use it for.
Chop your basil and add 2 tablespoons to boiling water to steep for about 5 minutes. Strain and sweeten with raw honey to taste and sip slowly to help with digestive issues. I suggest using raw honey, because it has its own healing properties. See my post on The Health Benefit of Spices to get the low down on how great honey is.
This can also soothe a cough or a sore throat. Skip the honey and once the tea cools, gargle with it for your sore throat.
If someone is congested, right after boiling the tea, remove from heat and breath the steam in to help with congestion. Just don’t get close enough to the steam that you get a steam burn.
Benefits
**Leaves help cure many types of fevers. Make into a decoction of boiled leaves with cardamom power and a ½ liter of water. Then mix with some sugar and milk to bring down an acute fever.
**Good for cough and respiratory infections.
**Decoction of the leaves, honey and ginger will help with flu, colds, bronchitis and asthma.
**Antiseptic properties for treatment of cuts and wounds
**Can also help with pain from measles, smallpox and chicken pox
**Helps with pain relief because basil acts like a COX-2 inhibitor
**Settles the stomach
**Muscle relaxing qualities
**Helps ease headaches
**Leaves boiled in water and drank as a tea is preventive against the dengue fever and malaria. They can also help with a sore throat by drinking it or gargling with it.

Oregano (Common)
Common Oregano is one of the most frequently grown oreganos all over the world and is also known as Oregano Vulgare.
This type of oregano is very easy to grow, maintain and harvest but it also quickly spreads across your garden. It grows from 6 inches to 1 foot tall. Oregano is a perennial herb that can be a bit invasive though is slower growing than mint.
It is the perfect herb to grow for a beginner. If you don’t want to get cuttings from your nearby farmer’s market or plant/garden centers, then start your seeds in 3-inch pots with a good potting mix and then transplant them outside or into bigger containers for indoor growing.
Start Your Oregano Early
Start these approximately 4-6 weeks before you want to move your oregano to your outside garden or deck container or to an indoor container.
Use a good all around potting soil (I use Miracle-Gro Potting Mix) for your indoor plants or seedlings because it will be the right mixture of soil, sand, and nutrients for your plants.
I happen to use Miracle-Grow Potting Mix and Miracle-Grow Plant Food because both have everything your plants need and that’s easy for us. And both products can be used on any of the plants I’ve been writing about.
To start your oregano plants, fill 3” pots with about 80% potting mix, add the seeds and just cover with a bit of soil. Spray with a bit of water. Place the pots in direct sunlight so they get at least eight hours of sun. Spray your oregano when needed. Check the soil by sticking your finger down about an inch or so to see if the soil is dry.
Just be careful because too much water can stunt the growth of the oregano.
After about 3-4 weeks, the oregano should be about 3 inches. This is when you can transplant them to a larger container or outside.
Harvesting
Oregano is most flavorful just before the flower buds form. Pick your oregano early in the morning before the heat gets to it. Cut the stems about halfway down each stem.
Wash your oregano thoroughly, then remove as much excess water as you can to get your oregano ready to dry. Your salad spinner can help with this.
Just like several of the other previous plants, oregano dries easily by simply tying in bundles and hanging in a closet or other dark, dry spot until completely dry.
Before storing your dried oregano, strip the leaves off the stems of your dried oregano. Do this by pulling from the bottom up with your fingers. Discard the stems.
You can also keep the leaves whole, partially crush them with a mortar and pestle, or grind them to powder them using a coffee grinder.
Store your dried oregano in an airtight container like this. If you have dried a lot of any of your herbal plants, you can also add food-grade desiccant packets like this.
How to Use
Oregano is good to use infused with honey. Simply fill a jar half full with oregano leaves then fill the jar with honey. For about a month or so, let the jar sit in a sunny window. You should turn the jar now and then.
When time is up, strain the leaves from the honey and store the remaining honey in a glass jar.
You can also infuse oregano in vinegar by covering fresh oregano with apple cider vinegar instead of honey. Then let the oregano and vinegar steep for 2 weeks. Strain and store in an airtight bottle. This can be applied topically to fight fungal infections like athlete’s foot.
Benefits
**Potent antioxidant, antibacterial, antifungal and antiviral
**Used to fight off illness
**Detoxifier
**Oregano can be used to help arthritis
**Great for your skin
**Helps repel mosquitoes and other insects
**Expectorant that is high in Vitamins A, C, and K

Rosemary
It is easier to pick-up rosemary plants from your local garden center rather than trying to grow the seeds yourself. Rosemary prefers warm summers, mild winters and can grow in the garden or in containers outside and indoors.
When growing rosemary indoors, you need to make sure to keep the soil moist and have the rosemary sitting in a sunny window with southern exposure.
Rosemary is an evergreen perennial shrub that is fairly drought-tolerant, but still needs regular watering. Just remember that this plant dislikes wet roots as it prefers well drained soil.
Plant rosemary in the spring in a full sun yet sheltered spot. Rosemary would do best if planted near a wall for warmth or by a fence to help with its height. (some species of rosemary can get to be six feet tall)
Rosemary is a well-known aromatic culinary herb, but it’s also important for health and as a pollinator-friendly plant. TIP: Deer don’t like rosemary. I plant it throughout my garden to keep the deer away. They love to eat my hostas down to the ground if the rosemary isn’t there. When I plant the rosemary, my hostas are around all season.
Indoors
Again, I prefer getting my rosemary from the local gardener. Transplant them to the containers that you like then mist them with water. This will help with humidity and stop your rosemary from drying out. Just be careful as they don’t like overwatering. Rosemary absolutely loves a sunny windowsill.
Harvesting
You can begin to harvest your rosemary six weeks after planting and continue all year round. Just snip off the top three inches of fresh growth. You can use rosemary leaves fresh or dried. Rosemary can be dried just the same as oregano.
How to Use
You can infuse rosemary leaves to make a soothing tea or use it concentrated in herbal syrups and tinctures.
Benefits
**Boost memory
**Is anti-inflammatory so helps relieve joint and arthritic pain
**Helps with muscle pain
**Stimulates hair growth and helps treat alopecia
**Diuretic properties
**Helps focus the mind, improves memory, and aids indigestion

Parsley
Put parsley in a container garden with basil and thyme and the parsley will thrive. Or put your parsley in a sunny spot and be sure to water consistently. It can tolerate some shade, but again, be sure to water.
Starting from a seed, parsley is slow to sprout. For this reason, I suggest getting your parsley when you go to your neighborhood garden center.
In cold zones, parsley is considered an annual; while in warmer zones, it can survive frost and you will get one more season of producing flowers and going to seed.
Once parsley goes to seed, you’ll find that the leaves turn bitter and it’s not good for cooking. Parsley actually tastes better the first year.
Parsley is a Taproot Plant
This herb grows great in a pot on a sunny windowsill. Fill an 8-10” deep flowerpot with potting soil. Parsley has a taproot (bigger, main root), so don’t go any smaller than the suggested pot size.
Don’t use terracotta or clay pots for parsley. These pots pull the moisture from the soil causing it to dry out too quickly. Your parsley won’t like that because it likes consistently moist soil. Use a plastic or glazed ceramic container instead, especially if you’re in a dry climate.
Parsley may like moist soil, but that doesn’t mean soggy soil, it’s risking root rot. Be sure whatever pot or container you use has at least one good drainage hole to keep water moving. (use the rocks like I suggested before) Set a plate underneath to catch any extra water.
Find a spot on your patio or deck that gets full or partial sun at least 6-8 hours per day. It also needs the same inside your house so park your plant in an all day sunny window.
TIP: Parsley is one of the many plants that can benefit from some mulch in the pot. Even a thin layer of straw, other organic matter like peat moss, can help retain moisture.
When stems produce three leaves, they are technically ready to harvest. But waiting until the plant is at least 6 inches tall is best.
Harvesting
Harvest by snipping off outer stems at the base with sharp scissors or garden shears. This encourages regrowth, as cutting stems toward the top or inside inhibits growth.
You can harvest just a few stems at a time to use right away in the kitchen or gather more to keep in the fridge (expect 3 days shelf life) or preserve.
Just be sure not to harvest more than ⅓ of the plant at a time, unless the season is over and you’re harvesting the whole thing! If that’s the case, definitely get busy preserving.
Some good ways to preserve herbs include drying and freezing. Try freezing chopped fresh herbs in olive oil — you can save the cubes and use individually in soups, sauces or whatever you’re making. Pretty easy!
How to Use
Parsley makes a great tea. Steep a few leaves in hot water, add sugar or honey and drink up to get the full benefits of the parsley.
If you were to drink one cup a day, it would help with symptoms for asthma, a chronic cough, sore throat, and IBS symptoms.
Another good way to get parsley is by adding it to your smoothies.
Parsley is mild tasting which makes it easy to put in all kinds of foods. You can also put it in salads, on sandwiches and just about anything you cook.
Benefits
**High in vitamin C, zinc, vitamin B9, potassium, calcium and Vitamin K
**Anti-aging due to the Vit C, beta carotene and zinc and high antioxidants, parsley nourishes your skin from the inside out
**Stimulates the production of collagen which helps with cell repair
**Anti-fungal, anti-bacterial and anti-inflammatory
**High in chlorophyll and iron
**Diuretic

Meet Some Other Herbs to Include in This Year’s Garden
While popular herbs like basil, rosemary, and thyme are commonly found in many gardens, there is a huge array of lesser-known herbs that can not only help with home remedies, but will also bring different flavors to your cooking.
Lemon Verbena
Lemon Verbena is a fragrant herb known for its refreshing lemony scent and flavor and has become popular worldwide for its culinary and medicinal uses. This perennial shrub that can grow up to 10 feet and is native to South America, particularly Argentina and Chile.
To grow lemon verbena, you can start with seeds or cuttings. The seeds should be sown in well-draining soil and lightly covered keeping the soil moist until germination occurs, in around two to three weeks.
For stem cuttings, select a healthy stem, remove the lower leaves, and place it in a container with water or moist soil. Make sure the cuttings receive indirect sunlight and need to maintain a consistently moist environment until roots develop.
When planting lemon verbena, choose a spot that receives full sunlight or partial shade with fertilized soil that is well-drained, and slightly acidic with a pH between 5.5 and 7.0. This plant needs regular water but be careful not to overwater.
Lemon verbena is sensitive to frost, so it is best suited for USDA hardiness zones 8 to 11.
How to Harvest
Lemon Verbena’s leaves contain the most potent flavor and fragrance. Wait until the plant has matured, usually after the first year of growth, before harvesting.
Pick the leaves in the morning when the aromatic oils are at their peak. Choose healthy, vibrant leaves and either pluck them individually or cut entire stems. Remember to leave enough foliage on the plant to support continued growth.
Lemon verbena leaves can be used fresh or dried. Dry the leaves by tying them in small bundles and hang them upside down in a warm, well-ventilated area away from direct sunlight.
Once dry, store the leaves in airtight containers in a cool, dark place to maintain their flavor and aroma.
Uses
Dried lemon verbena can be used to make herbal teas, infused oils, or added to culinary dishes as a flavorful seasoning. It can also be used in potpourri or sachets.
Benefits
**Has a calming and relaxing effect
**Can help soothe digestive issues
**Reduces bloating
**Natural remedy for anxiety and stress
**Has antioxidant and anti-inflammatory properties
**May help improve sleep

Thai Holy Basil
Thai Holy Basil is a highly regarded herb in Thai cuisine and traditional medicine. It is a member of the mint family (Lamiaceae) and is native to Southeast Asia.
This basil is an aromatic herb with a distinct peppery, clove-like flavor and fragrance. It has glossy, green leaves with purple stems and bears small, delicate purple or white flowers. Its revered in the Thai culture and is often referred to as the “Queen of Herbs.”
It thrives in warm climates and is typically grown as an annual herb in regions with cooler temperatures. This herb requires full sun or partial shade and well-draining soil. Sow the seeds directly in the garden or start them indoors and transplant them once the risk of frost has passed. Thai Holy Basil prefers regular watering but should not be overwatered to avoid waterlogged soil.
Uses for Thai Holy Basil
Besides the culinary uses for this herb, it also can be used medicinally. You can create flavorful infused oils or vinegars by steeping Thai Holy Basil leaves in a carrier oil or vinegar of your choice. Then use these infusions to drizzle over salads, roasted vegetables, or grilled meats to get the medicinal benefit along with a peppery, clove-like flavor in your food.
Many use this herb to make herbal tea and infusion by brewing the leaves in hot water. Or you can muddle a few leaved in the bottom of a glass and then add your preferred spirits, mixers or fruit juice for a Thai-inspired beverage.
Benefits
**May support mental clarity, enhance focus, and improve energy levels
**Antioxidant and anti-inflammatory
** May help the body cope with stress and promote overall well-being
**Gives respiratory support
**Believed to be an expectorant
**Digestive Aid

Stevia
I’ve included stevia in this article because it never ocurred to me to try and plant it myself. While not an herb, per se, it is a plant that we use for better health rather than sugar. I’m going to give planting this a try and will let you know how things turn out.
Stevia is a calorie-free sweetener taken from the leaves of the stevia plant that is native to South America, particularly Paraguay and Brazil. While it has an intense sweet taste, stevia does not add calories, nor does it affect blood sugar levels.
Generally, this plant is cultivated as an annual, but in warner climates is also grown as a perennial. It requires a sunny location with well-draining soil. Plant the seeds or young plants after the last frost in loose and fertile soil. Watering should be consistent, but don’t waterlog stevia because too much water can cause root rot in this plant.
How and When to Harvest Stevia
This plant grows small white flowers, but it’s best to harvest the leaves after the plant has reached between 8-12”, but before the plant flowers. Carefully pluck the leaves from the stems and also remove discolored or damaged leaves. The leaves can be used fresh or dried for later use.
To dry the leaves, spread them out in a single layer in a warm, well-ventilated area away from direct sunlight. Once the leaves are completely dry and brittle, store them in airtight containers in a cool, dark place.
Benefits of Stevia
**negligible effect on blood glucose and insulin response
**non-cariogenic (doesn’t contribute to tooth decay)
**low calorie alternative to sugar
Final Thoughts
When I think of healing herbs, I think of something like Echinacea, not basil or oregano. But, I love that something we generally already have in our homes can be so beneficial.
It’s so cool that an herb or spice that we cook with can also help us get well when not feeling very good.
I hope if you decide to start growing your own medicinal herbs and using them that you enjoy using them and get satisfaction out of doing so. It takes time and patience, but the effort is well worth the effort.
Stay Awesome!
Cher
Relevant Reading
Curb Appeal On A Budget
Easy Care Plants For Your Home
If you enjoyed my post, please share it—It would help me increase my readership and is a wonderful compliment!!
Always consult your doctor before using essential oils on children under five or while pregnant or breastfeeding. All content on this website is for educational and informational purposes only. It does not replace advice or directives from your doctor or attorney. I am not a doctor and the FDA has not evaluated this post, products and recipes. This post is not intended to diagnose, treat, cure, or prevent any disease. This post is not to be considered as a recommendation or an endorsement or advice of any medical or health treatment.


There is certainly a lot to find out about this subject. I love all the points you have made.
Thanks Larissa!!